Important note: The fan used in this design does not have an explosion-proof motor. Therefore this design should not be used anywhere there can be a buildup of flammable fumes or VOCs.
.
Now that I have shown that I have your safety in mind, let me tell you how I came to invent this.
I put this together for my outbuilding where I have my model railroad, and I’ve found since that my allergies just don’t bother me much out there. I initially threw it together because I was forever having problems with dust, and the dust was driving me crazy. The dust we get here is relentless, especially since it’s driven by the winds.
This does pretty much the same thing as those really expensive models, and the cost is minimal. It’s worked so well that I thought I’d share it here. The highest-cost item will be the air filter, unless you don’t have a spare box fan sitting around. Best of all is that you can see when the air filter needs replacing, and a replacement filter doesn’t cost a hundred bucks, like some of them. (Mine uses one of those washable ‘lifetime’ filters, but more about that in a minute.)
Some notes on the air filters: I recommend spending $15 or more for one of the really good anti-allergen filters for the inner filter, because it’s good at trapping dust; then you protect it from normal household crud by a regular, cheap, $3 filter. Here’s a photo to help you recognize the type of anti-allergen filter I’m talking about.

Okay, let’s build it.
PARTS:
Box fan (square), with an overall outside dimension of about 20 inches; typically you’ll find them running about 22 inches square.
Cheap $3 air filter from the hardware store
Good Anti-Allergy Air Filter from the hardware store
Two bungee cords, about 48 inches long
Lamp timer (optional)
4 – 18″ lengths of 1″ ID aluminum C-channel (optional but recommended)
ASSEMBLE:
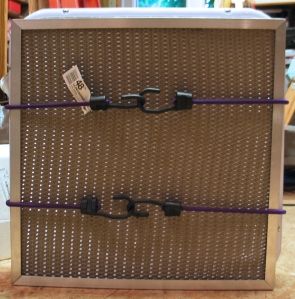
Stack the air filters on the intake side of the fan with the cheap one on the outside, to catch all the dust bunnies and dog hair. As you put it together, make sure to pay attention to the airflow arrow on the side. Slip the C-channel on the outside edges of each filter to take the pressure from the bungee cords so that the cords don’t crush the filters. Now wrap the bungee cords around the fan and filters, hooking the ends on each other to hold the air filters in place. (Because my fan has controls on the intake side, I put the filter on the discharge side for the sake of testing, as shown in the photo. Now that I know it works, I’ll swap the filter to the intake side. More on that in a moment.) Meanwhile, these photos will show you how to do it:
Again, put the filter on the intake side, not the discharge side as I show here. Since the controls will now be covered, you’ll need to put the fan on a lamp timer to give it a power switch and to save juice or just let it go, if you don’t mind it running all the time. It takes a few days to really start cleaning up the air if it’s on a timer.
My version of the finished CAC (CheapskateAir Cleaner) looks a little different because I used one of those ‘Allergy-Free from Aller-Pure’ air filters. I’d bought it on the recommendation of Paul Harvey, many years ago, but eventually found it was incompatible with my heat pump system, so it was just sitting around. It makes a perfect mate for this design.
The reason to NOT have the filters on the discharge side is because the blades can’t just beat the air through the filter; that creates turbulence and destroys their efficiency. By having the filters on the intake side, the blades have laminar flow and they PULL the air through the filters – and everything works.
You’ll have about 1/3 the flow of the normal fan with this setup; not enough to cool you on a hot day, but enough to keep air moving in a space and clean it.
As of this writing, the fan has been running (for 30 minutes out of every 4 hours) in my 12×16 hobby office for a couple weeks and the dust is noticably disappearing.


